
- Über …
- Ingenieure
- Technologien
- Impressum
- Rechtliche Hinweise
- Blog (ausrangiert)
Apertizer
Via Public AI, Spring AI can use Apertus with little effort. This guide shows how.
To follow along, you need to be familiar with Spring (Boot) in general and Spring AI in particular. If that is not the case yet, check out Spring in Action and Spring AI in Action, respectively.
If you already know how to create projects cleanly and how to configure them properly, you can skip ahead to the AI section.
Create Project
There are various ways to create a Spring Boot project. My preferred way is to use the Spring Initializr:
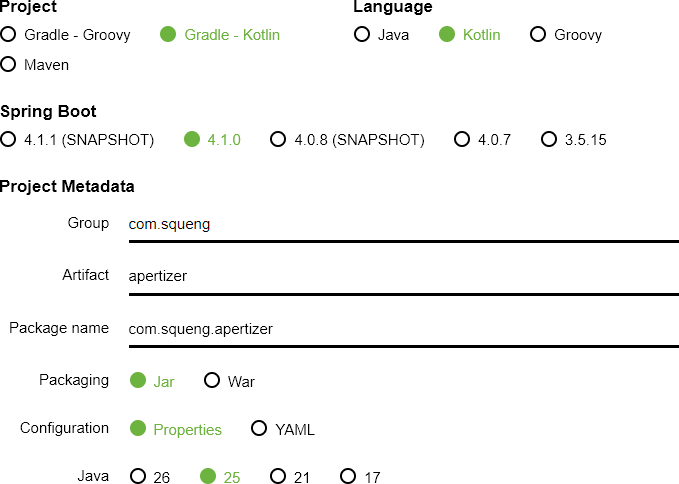
Even though Spring AI does not explicitly support Apertus and/or Public AI, we do not have to extend Spring’s AI Model API as Wells points out in the OpenAI compatibility box on page 13:
“Although most AI service providers have their own proprietary APIs, many offer OpenAI-compatible APIs either as their own API or as an alternative to their API. AI service providers such as Groq (https://groq.com/) and Google Gemini, tools such as vLLM (https://docs.vllm.ai/) and LiteLLM (https://www.litellm.ai/), and even Ollama offer APIs that are mostly compatible with OpenAI’s API. You can use Spring AI’s OpenAI starter to integrate with these APIs in the same way you would with OpenAI itself.”
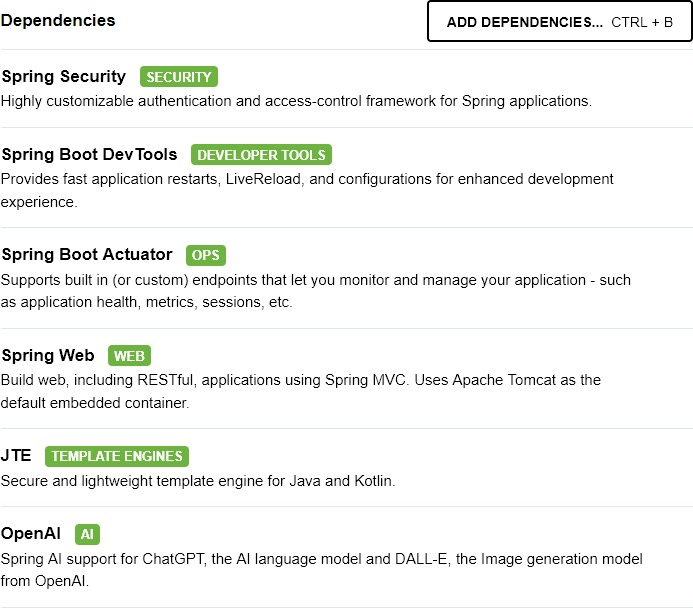
Before Java 21, I would have included Spring Reactive Web instead of Spring Web. But now that both Java and Spring support Virtual Threads and since Spring’s asynchronous model based on Project Reactor was never pleasant to work with (unlike Play’s asynchronous model based on Scala Futures), I am more than happy to switch back to Spring Web, but Virtual Threads must be enabled explicitly by adding the following line to src/main/resources/application.properties:
spring.threads.virtual.enabled=true
Create Subproject
In order to protect the business logic / domain from the “harsh world” around it (the Web framework, the DBMS, etc.), I am applying the Ports & Adapters pattern. I could do so within the main project (e.g., enforced by ArchUnit as explained in Get Your Hands Dirty on Clean Architecture or by Spring Modulith), but I prefer to take advantage of Gradle’s support for multi-project builds so that Gradle can help enforcing the boundary.
In my experience, applying the Ports & Adapters pattern is less of an option and more of a necessity. It is not even a trade-off as it still allows for adopting a Clean or Onion architecture when desired. And while I appreciate the concepts of Domain-Driven Design (DDD) as much as the next guy, I do not follow them mechanically, let alone slavishly. I do not even limit myself to OOP modeling; I find it perfectly fine to adopt data-oriented programming / FP modeling and, for example, even go so far as to represent entities (which are conceptually mutable) by case classes / data classes / records within a request-response cycle.
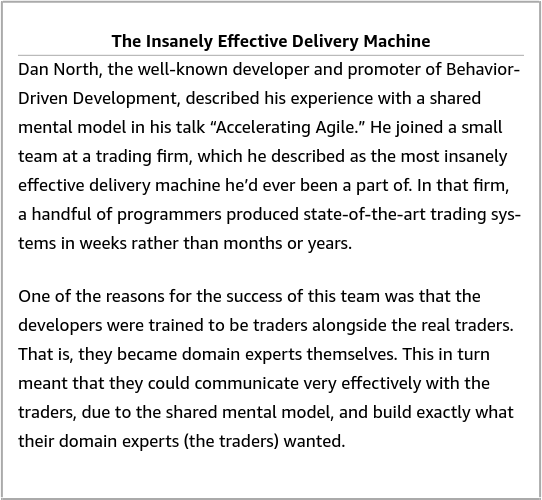
source: Domain Modeling Made Functional
Furthermore, I want to implement the business logic / domain in Scala, which Gradle supports through its Scala plugin.
Prepare the folders:
- within the project folder, alongside the existing
srcfolder, create a folderhexagon - within folder
hexagon, create anothersrcfolder - within folder
hexagon/src, create foldersmainandtest - within both folder
hexagon/src/mainand folderhexagon/src/test, create foldersresourcesandscala
Prepare the configuration:
- within the existing
build.gradle.ktsfile, add the subproject as well as the Scala library as dependencies:
extra["scalaVersion"] = "3.3.8"
extra["springAiVersion"] = "2.0.0-M2"

dependencies {
    implementation(project(":hexagon"))
    implementation("org.scala-lang:scala3-library_3:${property("scalaVersion")}")

    implementation("org.springframework.boot:spring-boot-starter-actuator")
- within the existing
settings.gradle.ktsfile, add the subproject as well:
rootProject.name = "apertizer"
include("hexagon")
- within folder
hexagon, create another filebuild.gradle.ktswith the following content:
plugins {
    id("scala")
}

repositories {
    mavenCentral()
}

scala {
    scalaVersion = "3.3.8"
}

dependencies {
    implementation("jakarta.annotation:jakarta.annotation-api:3.0.0")
    testImplementation("org.scalameta:munit_3:1.2.2")
}
Note the dependency on Jakarta Annotations. Annotations such as RolesAllowed allow for framework-independent access-control declarations. Note further that Spring Boot needs to be configured not to ignore them (see AppConfigSec below).
At this point, however, one does not have worry about Spring yet. While this guide continues with preparing profiles and configuring Spring, one could focus on the business logic / domain first. The subproject has everything one needs to implement and test the business logic / domain.
Speaking of testing, MUnit has been chosen as the testing library because it is part of the Scala Toolkit. (There are viable alternatives to the Scala Toolkit in general and to MUnit in particular.) More importantly, adhering to the Ports & Adapters pattern makes testing the business logic / domain much easier; no mocks/stubs/… library is required to create test doubles.
Profiles
Profiles (think DEV, TEST, etc.) are supported out of the box and allow for both profile-specific configuration files and configuration classes. In what follows, we are making use of both. As a preparation, create a file application-dev.properties within the project folder, alongside the existing application.properties file.
Note that “Profiles are not supported in devtools properties/yaml files.”. Therefore, we have to run our application passing arguments through the Gradle extension …
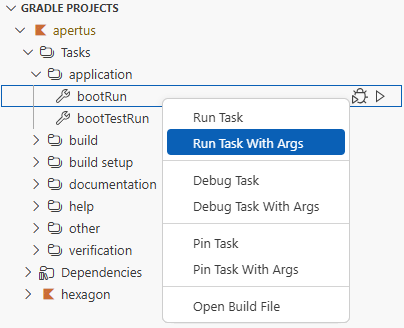
… and VSC …

… or through the command line: C:\Users\Paul\Desktop\Apertizer> ./gradlew bootRun --args='--spring.profiles.active=dev' (Note further that even though the developer tools have been included above, I first have to tell Gradle to re-build continuously when any classes have been changed: C:\Users\Paul\Desktop\Apertizer> ./gradlew -t classes)
General Spring Configuration
Security as a Forethought
Applying the Ports & Adapters pattern and enabling Spring Security in a teaching aid might seem like overkill. But you should bear with me. Too many textbook examples with concious shortcuts end up in prototypes which in turn end up in production. Eventually, some poor schmuck (quite possibly your future self) will have to clean the mess up.
Just enabling Spring Security (simply by having included it above) without configuring it would be fine at this stage. Being forced to sign in with the temporary user created at start-up time would be a constant reminder to properly configure security and would also be a safety net should the app be deployed prematurely. And since the developer tools have been included above, a convenience user could be added to $HOME/.config/spring-boot.spring-boot-devtools.properties in the meantime:
spring.security.user.name=yours_truly
spring.security.user.password=insecure_password
spring.security.user.roles=MISCAST
Nevertheless, we can do better from the start by adding the following configuration file/class to folder/package src/main/java/com/squeng/apertizer:
package com.squeng.apertizer;

import org.springframework.context.annotation.Bean;
import org.springframework.context.annotation.Configuration;
import org.springframework.security.config.annotation.method.configuration.EnableMethodSecurity;
import org.springframework.security.config.annotation.web.builders.HttpSecurity;
import org.springframework.security.config.annotation.web.configuration.EnableWebSecurity;
import org.springframework.security.web.SecurityFilterChain;

@Configuration
@EnableMethodSecurity(jsr250Enabled = true)
@EnableWebSecurity
public class AppConfigSec {

        @Bean
        public SecurityFilterChain filterChain(HttpSecurity http) throws Exception {
                http.authorizeHttpRequests(authorize -> authorize
                                .requestMatchers("/actuator/**", "/api/poorMansActuator/**")
                                .hasRole("ADMIN")
                                .requestMatchers("/apertus/**")
                                .hasRole("USER")
                                .requestMatchers("/", "/apple-touch-icon.png", "/favicon.ico", "/favicon.svg", "/*.css")
                                .permitAll()
                                .anyRequest()
                                .authenticated())
                                .headers(headers -> headers.contentSecurityPolicy(csp -> csp
                                                .policyDirectives(String.join("; ",
                                                                "default-src 'none'",
                                                                "connect-src 'self'",
                                                                "font-src 'self' https://cdn.jsdelivr.net/npm/bootstrap-icons@1.13.1/",
                                                                "img-src 'self' data:",
                                                                "script-src 'self' https://cdn.jsdelivr.net/npm/bootstrap@5.3.8/ https://cdn.jsdelivr.net/npm/htmx.org@2.0.8/",
                                                                "style-src 'self' 'unsafe-hashes' 'sha256-faU7yAF8NxuMTNEwVmBz+VcYeIoBQ2EMHW3WaVxCvnk=' https://cdn.jsdelivr.net/npm/bootstrap@5.3.8/ https://cdn.jsdelivr.net/npm/bootstrap-icons@1.13.1/",
                                                                "frame-ancestors 'none'"))))
                                .sessionManagement(session -> session
                                                .sessionFixation().newSession())
                                .formLogin(signIn -> signIn
                                                .loginPage("/signIn")
                                                .loginProcessingUrl("/signIn")
                                                .defaultSuccessUrl("/")
                                                .permitAll())
                                .logout(signOut -> signOut
                                                .logoutUrl("/signOut")
                                                .logoutSuccessUrl("/signIn?signedOut")
                                                .invalidateHttpSession(true)
                                                .permitAll());
                return http.build();
        }
}
(The three images in line .requestMatchers("/", "/apple-touch-icon.png", "/favicon.ico", "/favicon.svg", "/*.css") have been created with RealFaviconGenerator and added to src/main/resources/static.)
Since “Spring Boot Starter Security does not activate method-level authorization by default”, we activate it with @EnableMethodSecurity. However, if we are serious about keeping the business logic / domain independent of Spring, we must not annotate its methods with Spring-specific annotations, which is why we allow for using JSR-250 annotations.
There is no need to decide against request-level authorization when deciding for method-level authorization. We can use the best of both worlds.
By the way, while it is tempting to hiearchically order roles ADMIN and USER …
        @Bean
        public RoleHierarchy roleHierarchy() {
                return RoleHierarchyImpl.fromHierarchy("ROLE_ADMIN > ROLE_USER");
        }
… you should conciously (have to) sign in as either an admin or a user when you access your production system.
As is to be expected, the default security headers are a good start. Adding a restrictive Content Security Policy is even better. And remember to regularly check your app with Mozilla’s HTTP Observatory.
Actuator
Even though Actuator provides features for managing and monitoring apps during production, we can take advantage of it as early as during development.
Since the developer tools have been included above, (additional) endpoints can be enabled in $HOME/.config/spring-boot.spring-boot-devtools.properties. For example, by enabling the env endpoint, we can not only visit http://localhost:8080/actuator and http://localhost:8080/actuator/health but also http://localhost:8080/actuator/env: management.endpoints.web.exposure.include=env,health
JTE
Disable development mode in application.properties by setting gg.jte.development-mode to false, but add gg.jte.development-mode=true to application-dev.properties. Furthermore, precompile the templates for production by adding gg.jte.usePrecompiledTemplates=true to application.properties, but add gg.jte.usePrecompiledTemplates=false to application-dev.properties.
i18n / l10n
Spring Boot and JTE support Internationalization (i18n) and localization out of the box, but need some minor bridging.
First, however, let us prepare the l10n files:
- within folder
src/main/resources, create a folderlang - within folder
lang, create filemessages.propertiesfor the default language and further files for further languages (e.g.,messages_de.propertesfor German)
The following JteLocalizer class is the bridge between Spring Boot’s MessageSource and JTE’s LocalizationSupport:
package com.squeng.apertizer.gui;

import org.springframework.context.MessageSource;
import org.springframework.context.i18n.LocaleContextHolder;

import gg.jte.support.LocalizationSupport;

public class JteLocalizer implements LocalizationSupport {

    private final MessageSource messageSource;

    public JteLocalizer(MessageSource messageSource) {
        this.messageSource = messageSource;
    }

    @Override
    public String lookup(String key) {
        return messageSource.getMessage(key, null, LocaleContextHolder.getLocale());
    }
}
To make an instance available to all JTE templates without having to add it to the UI model in every controller method, we can add it to the UI model through a ControllerAdvice:
package com.squeng.apertizer.gui;

import org.springframework.security.web.csrf.CsrfToken;
import org.springframework.ui.Model;
import org.springframework.web.bind.annotation.ControllerAdvice;
import org.springframework.web.bind.annotation.ModelAttribute;

@ControllerAdvice(basePackages = "com.squeng.apertizer.gui")
public class JteControllerAdvice {

    private final JteLocalizer jteLocalizer;

    public JteControllerAdvice(JteLocalizer jteLocalizer) {
        this.jteLocalizer = jteLocalizer;
    }

    @ModelAttribute
    public void csrf(Model model, CsrfToken token) {
        model.addAttribute("csrfToken", token);
    }

    @ModelAttribute
    public void l10n(Model model) {
        model.addAttribute("localizer", jteLocalizer);
    }
}
…
Spring AI Configuration
The switch from Open AI to Public AI with one of the two Apertus models is made by adding the following lines to src/main/resources/application.properties:
spring.ai.openai.api-key=${PUBLIC_AI_API_KEY}
# spring.ai.openai.api-key for DEV is set in $HOME\.config\spring-boot-devtools.properties
spring.ai.openai.base-url=https://api.publicai.co/v1
# spring.ai.openai.chat.base-url=https://api.publicai.co/v1
spring.ai.openai.chat.model=swiss-ai/apertus-8b-instruct
# spring.ai.openai.chat.model=swiss-ai/apertus-70b-instruct
The production API key will have to be configured through an environment variable. But since the developer tools have been included above, the development API key can be added to $HOME/.config/spring-boot.spring-boot-devtools.properties and is picked up in the usual order.
As trivial as it may seem now, Wells’ tip in the Inspecting Spring AI requests and responses box on page 41 helped me figure out that prefixing the model with swiss-ai/ is the way to go (whereas setting the spring.ai.model.chat property to swiss-ai is not as that would cause Spring AI to look for a ChatModel implementation that does not exist):
“If you’d like to see what the raw request and response JSON looks like when submitting prompts with Spring AI, then you’ll want to add Logbook (https://github.com/zalando/logbook) to your project’s build”
- Within the top-level
build.gradle.ktsfile, addimplementation("org.zalando:logbook-spring-boot-starter:4.0.0-RC.1")to thedependencies. - With a dev profile (see above), add the following lines to
src/main/resources/application-dev.properties…
logging.level.org.zalando.logbook=TRACE
logbook.format.style = http
- … and the following configuration file/class to folder/package
src/main/java/com/squeng/apertizer:
package com.squeng.apertizer;

import org.springframework.boot.restclient.RestClientCustomizer;
import org.springframework.context.annotation.Bean;
import org.springframework.context.annotation.Configuration;
import org.springframework.context.annotation.Profile;
import org.zalando.logbook.spring.LogbookClientHttpRequestInterceptor;

@Configuration
@Profile("dev")
public class AppConfigDev {

    @Bean
    // cf. Spring AI in Action, page 41
    public RestClientCustomizer logbookCustomizer(LogbookClientHttpRequestInterceptor interceptor) {
        return restClient -> restClient.requestInterceptor(interceptor);
    }
}
From here on, you could try the many third-party examples out with Apertus …
Code
… or continue with my example.
Business Logic / Domain
Again, this section could have immediately followed creating the subproject even though this guide follows the latter with preparing profiles and configuring Spring.
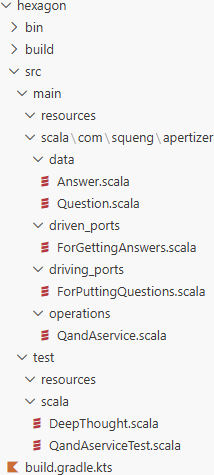
The example domain is conciously kept simple and rather reflects FP domain modeling than OOP domain modeling in general and DDD in particular.
package com.squeng.apertizer.data

final case class Answer(a: String)
package com.squeng.apertizer.data

final case class Question(q: String)
The ports demarcate the border of the hexagon, with the driving port(s) being implemented within the hexagon and the driven port(s) outwith.
package com.squeng.apertizer.driven_ports

import com.squeng.apertizer.data.Answer
import com.squeng.apertizer.data.Question

trait ForGettingAnswers:
  def ask(question: Question): Answer
package com.squeng.apertizer.driving_ports

import com.squeng.apertizer.data.Answer
import com.squeng.apertizer.data.Question

trait ForPuttingQuestions:
  def ask(question: Question): Answer
package com.squeng.apertizer.operations

import jakarta.annotation.security.RolesAllowed

import com.squeng.apertizer.data.Answer
import com.squeng.apertizer.data.Question
import com.squeng.apertizer.driven_ports.ForGettingAnswers
import com.squeng.apertizer.driving_ports.ForPuttingQuestions

class QandAservice(oracle: ForGettingAnswers) extends ForPuttingQuestions:
  require(oracle != null, "🐛")

  @RolesAllowed(Array("USER"))
  override def ask(question: Question): Answer =
    oracle.ask(question)
For testing puroposes, however, we also provide an implementation of the driven port within the hexagon …
package com.squeng.apertizer.driven_ports

import com.squeng.apertizer.data.Answer

import com.squeng.apertizer.data.Question

object DeepThought extends ForGettingAnswers:
  override def ask(question: Question): Answer = Answer(42.toString)
… and simply inject it “by hand”.
package com.squeng.apertizer.operations

import com.squeng.apertizer.data.Question
import com.squeng.apertizer.data.Answer
import com.squeng.apertizer.driven_ports.DeepThought
import com.squeng.apertizer.operations.QandAservice
import com.squeng.apertizer.driven_ports.DeepThought

class QandAserviceTest extends munit.FunSuite:
  test("instatiate QandAservice without any driven port") {
    intercept[IllegalArgumentException] {
      val corruptService = QandAservice(null)
    }
  }

  test("have QandAservice defer to a driven port") {
    val answer = QandAservice(DeepThought).ask(Question("🤔"))
    assertEquals(answer, Answer(42.toString))
  }
Spring
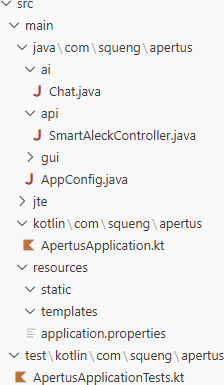
package com.squeng.apertizer.ai;

import org.springframework.ai.chat.client.ChatClient;
import org.springframework.ai.openai.OpenAiChatOptions;
import org.springframework.context.annotation.Primary;
import org.springframework.stereotype.Component;

import com.squeng.apertizer.data.Answer;
import com.squeng.apertizer.data.Question;
import com.squeng.apertizer.driven_ports.ForGettingAnswers;
import com.squeng.apertizer.session.UserSession;

@Component
@Primary
public class KnowItAll implements ForGettingAnswers {

    private final ChatClient chatClient;
    private final UserSession userSession;

    public KnowItAll(ChatClient.Builder chatClientBuilder, UserSession userSession) {
        this.chatClient = chatClientBuilder.build();
        this.userSession = userSession;
    }

    @Override
    public Answer ask(Question question) {
        return Answer.apply(chatClient.prompt()
                .user(question.q())
                .options(OpenAiChatOptions.builder().model(userSession.getApertus().getChatOptionsModel()))
                .call()
                .content());
    }
}
Note how KnowItAll is annotated with @Primary. During development or testing, we may not always want to actually query Apertus and instead use a dummy implementation of ForGettingAnswers such as the following:
package com.squeng.apertizer.dev;

import org.springframework.ai.chat.client.ChatClient;
import org.springframework.stereotype.Component;
import org.springframework.web.bind.annotation.GetMapping;

import com.squeng.apertizer.data.Answer;
import com.squeng.apertizer.data.Question;
import com.squeng.apertizer.driven_ports.ForGettingAnswers;

@Component
public class SmartAleck implements ForGettingAnswers {

    @Override
    public Answer ask(Question question) {
        return Answer.apply("figuring out the answer to this question is left as an exercise for the questioner");
    }
}
package com.squeng.apertizer.api;

import org.springframework.web.bind.annotation.GetMapping;
import org.springframework.web.bind.annotation.RequestMapping;
import org.springframework.web.bind.annotation.RequestParam;
import org.springframework.web.bind.annotation.RestController;

import com.squeng.apertizer.data.Question;
import com.squeng.apertizer.driving_ports.ForPuttingQuestions;

@RestController
@RequestMapping("/api/sa")
public class QandAcontroller {

    private final ForPuttingQuestions researcher;

    public QandAcontroller(ForPuttingQuestions researcher) {
        this.researcher = researcher;
    }

    @GetMapping(produces = "text/plain")
    public String ask(@RequestParam String q) {
        return researcher.ask(Question.apply(q)).a();
    }
}
In order for the subproject to be truly independent of Spring, we cannot use any Spring annotations within the hexagon and must configure the concrete adapters for the abstract ports outside of the subproject:
package com.squeng.apertizer;

import org.springframework.context.annotation.Bean;
import org.springframework.context.annotation.Configuration;

import com.squeng.apertizer.driven_ports.ForGettingAnswers;
import com.squeng.apertizer.driving_ports.ForPuttingQuestions;
import com.squeng.apertizer.operations.QandAservice;

@Configuration
// the configurator in Ports & Adapters terminology
public class AppConfig {

    private final ForGettingAnswers oracle;

    public AppConfig(ForGettingAnswers oracle) {
        this.oracle = oracle;
    }

    @Bean
    public ForPuttingQuestions fpqService() {
        return new QandAservice(oracle);
    }
}
package com.squeng.apertizer;

import java.util.List;

import org.springframework.boot.restclient.RestClientCustomizer;
import org.springframework.context.annotation.Bean;
import org.springframework.context.annotation.Configuration;
import org.springframework.context.annotation.Profile;
import org.springframework.security.access.hierarchicalroles.RoleHierarchy;
import org.springframework.security.access.hierarchicalroles.RoleHierarchyImpl;
import org.springframework.security.core.authority.SimpleGrantedAuthority;
import org.springframework.security.core.userdetails.User;
import org.springframework.security.core.userdetails.UserDetailsService;
import org.springframework.security.crypto.bcrypt.BCryptPasswordEncoder;
import org.springframework.security.crypto.password.PasswordEncoder;
import org.springframework.security.provisioning.InMemoryUserDetailsManager;
import org.zalando.logbook.spring.LogbookClientHttpRequestInterceptor;

@Configuration
@Profile("dev")
public class AppConfigDev {

    @Bean
    // cf. Spring AI in Action, page 41
    public RestClientCustomizer logbookCustomizer(LogbookClientHttpRequestInterceptor interceptor) {
        return restClient -> restClient.requestInterceptor(interceptor);
    }

    @Bean
    public PasswordEncoder passwordEncoder() {
        return new BCryptPasswordEncoder();
    }

    @Bean
    public UserDetailsService userDetailsService(PasswordEncoder encoder) {
        return new InMemoryUserDetailsManager(List.of(
                new User(
                        "theUser", encoder.encode("insecure-password"),
                        List.of(new SimpleGrantedAuthority("ROLE_USER"))),
                new User(
                        "theAdmin", encoder.encode("insecure-password"),
                        List.of(new SimpleGrantedAuthority("ROLE_ADMIN"))),
                new User(
                        "theLazyDev", encoder.encode("insecure-password"),
                        List.of(new SimpleGrantedAuthority("ROLE_LAZYDEV")))));
    }

    @Bean
    public RoleHierarchy roleHierarchy() {
        return RoleHierarchyImpl.withDefaultRolePrefix()
                .role("LAZYDEV").implies("ADMIN", "USER")
                .build();
    }
}